Follow the below steps for creating and configuring a MySQL DataSource in GlassFish application server.
1. Download MySQL JDBC driver from http://dev.mysql.com/downloads/connector/j/3.1.html
2. Extract the contents of the zip file
3. Copy mysql-connector-java-x.x.x-bin.jar to GLASS_FISH_INSTALL_DIR\lib folder.
3. Start your GlassFish Application server by issuing the command ‘asadmin.bat start-domain domain1′ from GLASS_FISH_INSTALL_DIR\bin directory.
4. Login to GlassFish admin console. The default url for GlassFish admin console will be http://localhost:4848/login.jsf. The default username and password for accessing the admin console will be admin and adminadmin respectively.
5. From Common Task menu expand Resources menu by clicking on Resources menu.
6. Expand JDBC under resources.
7. Click on ‘Connection Pools’ under JDBC menu. The Connection Pools page will be displayed.

8. Click on New.
9. Enter a name for your JDBC Connection pool. Select javax.sql.ConnectionPoolDataSource as your ‘Resource Type’ and select MySQL as your ‘Database vendor’.

10. Click on Next.
11. Fill the details according to your need. Minimum you need to fill the following fields.
a. DatabaseName
b. Password
c. URL (The format will be jdbc:mysql://localhost:3306/test. Where test is your database name.)
d. Url (The format will be jdbc:mysql://localhost:3306/test. Where test is your database name.)
e. ServerName
f. User
12. Click on Finish. You will be taken back to the Connection Pools page.
13. Click on the Connection Pool you created. You will be taken to ‘Edit Connection Pool’ page.
14. Click on Ping. If your connection pool is setup correctly you will get a Ping Succeeded message.

15. Now click on JDBC Resorces under JDBC menu.
16. Click on New.
17. Enter a JNDI Name for your data source. Select the pool you created by following the above steps as your ‘Pool Name’.
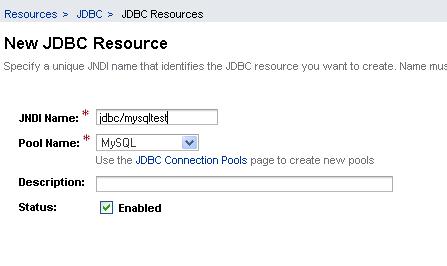
18. Click on OK. You are done.To obtain a connection using the above DataSource, use the following code.
Source: http://www.albeesonline.com
http://www.albeesonline.com/blog/2008/08/06/creating-and-configuring-a-mysql-datasource-in-glassfish-application-server/
No comments:
Post a Comment